Make Your Own Whizbangs for Geocaching
While we were at GeoWoodstock X for the annual geocaching convention, we saw a lot of really nifty, innovative caches. One, in particular, is quite easy to make, and costs practically nothing, as it uses your discarded soda pop or sports drink bottles. I’d seen this type of cache around here before, but always heard it referred to as, “two bottle tops glued together”. I found out at GeoWoodstock that they actually have a name: whizbangs (sometimes seen as whizzbangs).
After we returned home, I started playing around with making these, and have come up with a pretty decent system. Here’s how to make them:
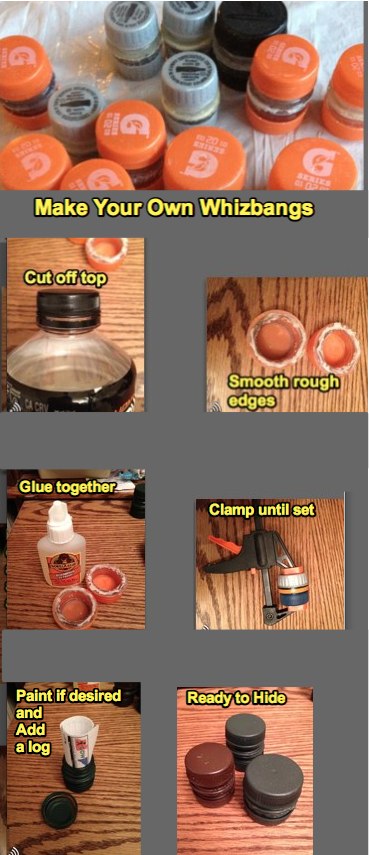
Start with your drink bottle. I drink a lot of sports drinks, so there’s no shortage of those bottles. But, they come in various sizes, so whatever you use, just make sure you have two of the same size, because you need two bottles for each whizbang you want to make. I usually make about a dozen at a time. It doesn’t take a lot longer to do several than it does to do one. Start by using a hacksaw or Dremel-type tool to cut the tops off the bottles. I prefer a Dremel because it’s quicker and easier for me. Also, I can use a cutting tool to cut the bottle tops, then switch to a sanding disc to tidy the edges a bit.
You need to cut them right below the ‘lip’, where it juts out a bit just below the little plastic ring that remains after you open the top. You’ll see what I mean in the pictures if it doesn’t make sense. If the cuts aren’t perfectly straight, don’t worry about it. You can fix it by using a little sandpaper or your Dremel to sand it later. Once you have your bottle tops, sand them a bit, if needed, to have the bottoms fairly smooth. It makes it easier to glue them together if they are more smooth. Again, it doesn’t have to be perfect, as the glue will take care of a little bit of it.
Now, you’re ready to glue the tops together to form a single piece. I generally use Gorilla glue for a couple of reasons: it expands as it sets, which helps to cover any imperfections (like the bottoms not being completely smooth), and it makes it more impervious to the elements, since no one likes opening a cache and pulling out a wet log. Yuk. It also takes paint nicely if you plan to paint them. However, you can use any just about any kind of glue you want. I’ve experimented a bit, and use different kinds depending on how my pieces ended up. If I’m gluing together a couple of really smooth pieces, and I’m not going to paint it, then I might use a clear contact cement. It’s totally up to you. I’ve noticed that some folks will put a couple of drops of glue on one end of their whizbang, on the bottle threads, so it only opens at one end. This is especially helpful if you’re running a small wire thru one end to anchor it to something. Having it only unscrew on one end makes it easier to keep it all together. That’s just personal preference as well, so just do what works for you based on where you plan to hide the cache.
Now, you can clamp the two glued caps together to let the glue set. Depending on what you use, you might not have to clamp it, but I usually do, more out of habit than anything else. It just seems that they get a better seal they’re clamped, even for a little while. One of the first ones that I didn’t clamp migrated just a little after I glued it and left it, so that when I returned a couple hours later to check it, I was surprised to find a very offset cache. Now I just clamp them to keep the halves from wandering until the glue sets.
Once the glue is set, you can congratulate yourself on making your very first whizbang. Now is the time to paint them, if you so desire. I usually go with shades of brown, green, or black, or even all three for better camouflage. Sometimes I leave them unpainted, but not often. It just looks more finished to me, but again, that’s just my preference. That’s one of the nice things about making your own…you can do whatever pleases you.
After the paint has dried, just add a log, and find the perfect place to hide it. Congratulations!
Feel free to tell me about other homemade caches you’ve seen. I’ll be sharing some others that I’ve been working on soon. There are step by step photo instructions in the snapshot here for those of you (like me) who do better with visual guides. Enjoy, and get caching.

You must be logged in to post a comment.